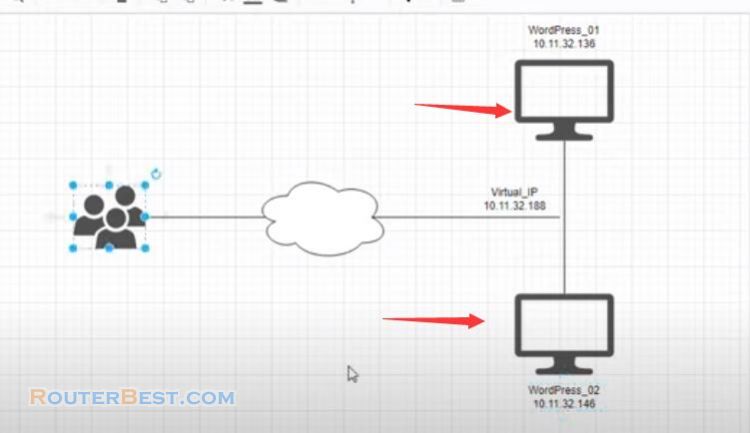
This article explains how to synchronize your database as well as your website's storage directory. Before that, you'd better read "How to Build a Wordpress Website with two Servers".
Synchronize the Database between the two Servers
Install mariadb on both servers first.
sudo apt install mariadb-server mariadb-client -y
After installing mariadb, open the configuration file and update the information as follows. By default, mariadb is only used on the local computer, if you want to access it remotely, you need to change it as follows.
sudo nano /etc/mysql/mariadb.conf.d/50-server.cnf
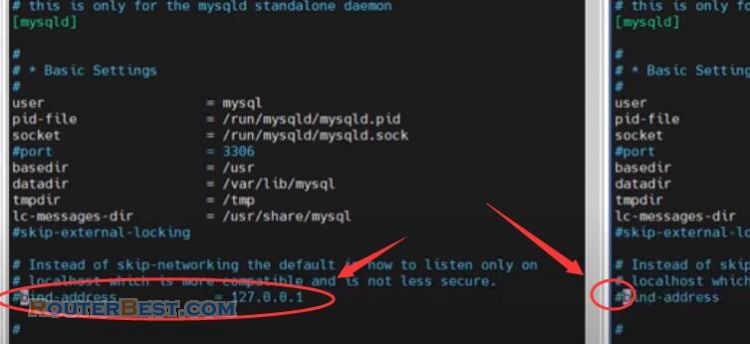
Next you identify the database servers. For the first server, the identifier is 1, for the second server, the identifier is 2. The identifiers on the two servers must be different.
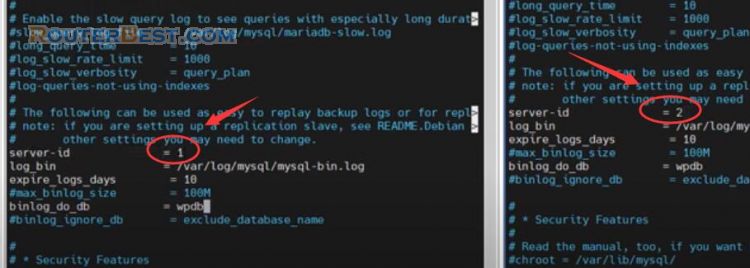
After updating the information, save and exit. For the changes to take effect, restart the mysql service.
sudo systemctl restart mysql
I will do the database sync configuration on each server.
sudo mysql
First I will do it on the first server, the second server will sync data with the first server. On the first server I create a new user repuser and give this user permission so that the second server can use it to sync with the first server.
CREATE USER 'repuser'@'%' IDENTIFIED BY 'password';
GRANT REPLICATION SLAVE ON *.* TO 'repuser'@'%';
FLUSH PRIVILEGES;
In addition to the username and password you get more information about the log and the position.
show master status\G;
With the information we have, we will synchronize the database on the second server with the first server. You need the ip address of the first server, username, password, log, position to sync with the database on the first server. First server ip address is 10.11.32.136, username is repuser, password is password. Then you copy the log and position information.
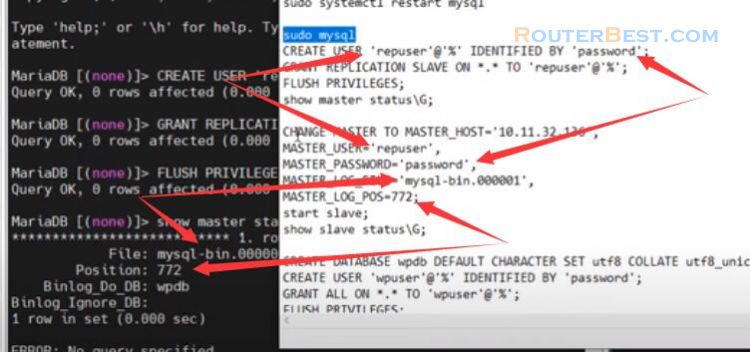
CHANGE MASTER TO MASTER_HOST='10.11.32.136',
MASTER_USER='repuser',
MASTER_PASSWORD='password',
MASTER_LOG_FILE='mysql.bin.000001',
MASTER_LOG_POS=772;
You start the slave and see the status. If you see a message with two words Yes, the synchronization is successful.
start slave;
show slave status\G;
Next I will sync the first server database with the second server. Same steps as above but only change the order between the two servers.
On the second server you create a new account and grant replication permission. To make it easier, I created the same account as on the first server. Then just like the first server you get the log and postion information on the second server.
You update the ip address of the server two 10.11.32.146. Next you update your username, password, log and position. With this information you can synchronize the first server database with the second server.
Just like the second server, you check the slave status on the first server for the result. If you receive a message with two words Yes, you have succeeded.
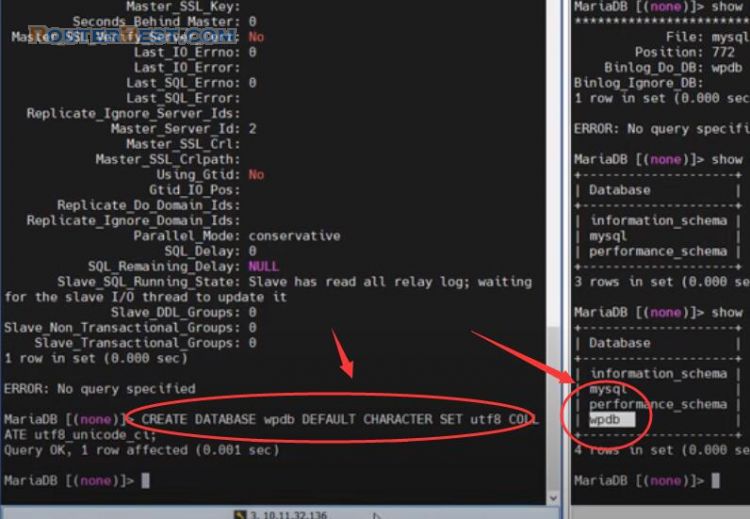
After the databases on the two servers have been synchronized, you create a new database for your website.
Here I create a new database named wpdb. As you can see I created a new database on the first server, and on the second server also appeared a new database named wpdb.
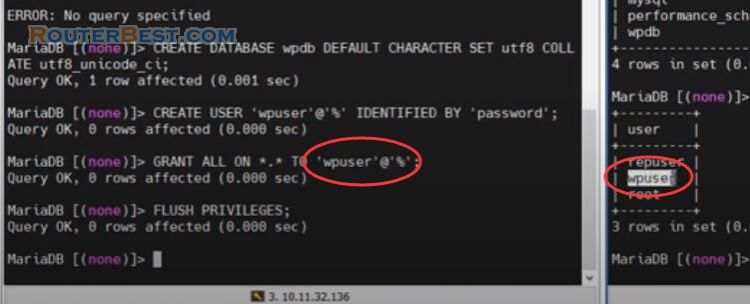
To be able to access the wpdb database you create a new user. In this example I create a new user wpuser with password: password. You will see on the second server also a new user: wpuser.
So we have configured the databases for the two servers and made sure they are synchronized with each other. Next I will show you how to sync your website storage folder with Gluster.
Synchronize your website storage folder with GlusterFS
First of all you open the hosts file and add the two lines as follow.
sudo nano /etc/hosts
With these two lines you will define ip address 10.11.32.146 is web1, and define ip address 10.11.32.146 is web2. You edit the hosts file on both servers.

Next you install gluster on both servers.
sudo add-apt-repository ppa:gluster/glusterfs-7
sudo apt update -y
sudo apt install glusterfs-server -y
After the installation is complete, start gluster. Then you enable gluster to make sure when the server restarts the gluster service still works.
sudo systemctl start glusterd.service
sudo systemctl enable glusterd.service
To synchronize data with gluster between two servers you use the name defined in the previous step. Web1 is the first server, web2 is the second server. To connect two servers you only need to do it on one server, here I work on the first server.
sudo gluster peer probe web1,web2
sudo gluster peer status
Because the two servers are peer-to-peer, you can do it on any server. Next I create a shared folder volume1.
sudo gluster volume create volume1 replica 2 web1:/gluster-storage web2:/gluster-storage force
sudo gluster volume start volume1
sudo gluster volume status
The data on this shared folder will be synchronized on both servers.
To be able to sync your webstorage folder you need to mount the webstorage folder with the volume1 shared folder. Before syncing data, I will delete apache default html file on both servers.
I would then mount apache's default web-storage directory with the volume1 shared folder. This mount will be canceled when the server restarts. So to make sure the mount doesn't get dropped when the server restarts you edit the file fstab. You perform the mount on both servers and take care to correct the information for each server.
sudo mount -t glusterfs web1:/volume1 /var/www/html
sudo nano /etc/fstab
web1:/volume1 /var/www/html glusterfs defaults,_netdev 0 0
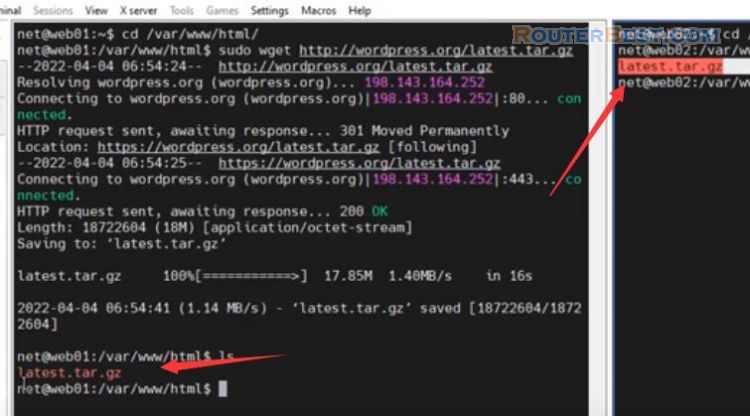
After updating the fstab file, the mounts will be maintained even if the server is restarted. After you configure web hosting directory sync, you download the latest wordpress file to the default apache directory.
sudo apt install php libapache2-mod-php php-mysql -y
cd /var/www/html
sudo wget http://wordpress.org/latest.tar.gz
sudo tar xzf latest.tar.gz
sudo mv wordpress/* .
sudo chown -R www-data:www-data /var/www/html
To ensure synchronization between the two servers, you can check if the files appear on both servers at the same time. As you can see, the files are synced on both servers, You just need to install Wordpress on the first server, the second server will automatically sync.
Facebook: https://www.facebook.com/routerbest
Twitter: https://twitter.com/routerbestcom
Tags: Synchronize WordPress mariadb

