This article explains how to create a free network monitoring tool using a virtual machine. Today I will introduce to you a free network monitoring software that is LibreNMS. My first impression is that LibreNMS has a nice and easy to use interface. The interface of LibreNMS is quite similar to Observium.

So how to install, please follow me. Since LibreNMS has to be installed on Linux, I will use a virtual machine to install it. Here the hypervisor I use is VirtualBox and the OS is Ubuntu server.
To get the LibreNMS monitoring tool you need to do 3 steps: create a virtual machine, install LibreNMS and finally add the devices to be monitored.
Create a Virtual Machine
First I will create a new Ubuntu server virtual machine with VirtualBox hypervisor. You set up the virtual machine's network in bridge mode so that it can connect to the devices you want to monitor. Both VirtualBox and Ubuntu Server are free.

Memory Size : 2048M
Hard disk : Create a virtual hard disk now
Hard disk file type : VDI ( Virtual Disk Image )
Storage on physical hard disk : Dynamically allocated
File location and size : 30GB

Network : Bridged Adapter

Click "Start" to install.

You don't want your virtual machine's ip address to be changed by rebooting or restarting the virtual machine, so I recommend you assign a static address to the virtual machine.

Here I assign the ip address to the virtual machine as 10.11.32.60, Gateway : 10.11.32.140, Name servers : 8.8.8.8,8.8.4.4
You write down this ip address to use in the next steps.

During the installation of Ubuntu server you will be asked to create a new account, write down this information to use in the next steps. You enable OpenSSH Server for Ubuntu Server, this is very important because it will make it easier for you to execute the commands in the following steps.
The initial setup is done, the installation should take about 5 minutes. After 5 minutes, you let the virtual machine restart and you have created an Ubuntu server virtual machine on VirtualBox.
We will do the second step of this article which is to install LibreNMS on Ubuntu virtual machine.
Install LibreNMS
As mentioned before, you have OpenSSH enabled on Ubuntu so I can ssh to the virtual machine.

You switch to the root account with the command "sudo -i". Before you install any software on Ubuntu, you need to update it.
apt update & apt upgrade -y
So where do you find LibreNMS installation instructions, it's simple, it's on the LibreNMS homepage. At first you will see a lot of commands but that's okay, most of them are just copy and paste.
Let's start installing LibreNMS.
The first is to install the necessary packages by copying and pasting.
apt install software-properties-common
add-apt-repository universe
apt update
apt install acl curl composer fping git graphviz imagemagick mariadb-client mariadb-server mtr-tiny nginx-full nmap php7.4-cli php7.4-curl php7.4-fpm php7.4-gd php7.4-gmp php7.4-json php7.4-mbstring php7.4-mysql php7.4-snmp php7.4-xml php7.4-zip rrdtool snmp snmpd whois unzip python3-pymysql python3-dotenv python3-redis python3-setuptools python3-systemd python3-pip
Next you add a new account librenms
useradd librenms -d /opt/librenms -M -r -s "$(which bash)"
Download LibreNMS
cd /opt
git clone https://github.com/librenms/librenms.git
Assign permissions to the folders and files downloaded in the previous step.
chown -R librenms:librenms /opt/librenms
chmod 771 /opt/librenms
setfacl -d -m g::rwx /opt/librenms/rrd /opt/librenms/logs /opt/librenms/bootstrap/cache/ /opt/librenms/storage/
setfacl -R -m g::rwx /opt/librenms/rrd /opt/librenms/logs /opt/librenms/bootstrap/cache/ /opt/librenms/storage/
Install PHP dependencies
su - librenms
./scripts/composer_wrapper.php install --no-dev
exit
Sometime when there is a proxy used to gain internet access, the above script may fail. The workaround is to install the composer package manually. For a global installation:
wget https://getcomposer.org/composer-stable.phar
mv composer-stable.phar /usr/bin/composer
chmod +x /usr/bin/composer
Next you set the time zone for PHP
This is very important as it will affect your monitoring results. If the time zone is incorrect, your test information will be wrong in time, resulting in incorrect results.
nano /etc/php/7.4/fpm/php.ini
nano /etc/php/7.4/cli/php.ini
Press "Ctrl + W" to edit. If you want to know where your time zone is, go to php.net.

Don't forget to save the changes with "Crtl + X", then select "Y". As suggested don't forget to update your Ubuntu OS's time zone.
timedatectl set-timezone Etc/UTC
Database customizations
Please follow the instructions of LibreNMS.
nano /etc/mysql/mariadb.conf.d/50-server.cnf
Within the [mysqld] section add:
innodb_file_per_table=1
lower_case_table_names=0

Don't forget to save the changes with "Crtl + X", then select "Y".
systemctl enable mariadb
systemctl restart mariadb
mysql - u root
Create a database for LibreNMS
For the first install, I recommend not to change information like database name, username and password.
CREATE DATABASE librenms CHARACTER SET utf8mb4 COLLATE utf8mb4_unicode_ci;
CREATE USER 'librenms'@'localhost' IDENTIFIED BY 'password';
GRANT ALL PRIVILEGES ON librenms.* TO 'librenms'@'localhost';
FLUSH PRIVILEGES;
exit
php-fpm configuration
cp /etc/php/7.4/fpm/pool.d/www.conf /etc/php/7.4/fpm/pool.d/librenms.conf
nano /etc/php/7.4/fpm/pool.d/librenms.conf
You correct the information as instructed. Change [www] to [librenms], Change user and group to "librenms", Change "listen" to a unique name.
listen = /run/php-fpm-librenms.sock

Configure the web server
Here, you review the ip address of your virtual machine.
hostname -I
As in this example my virtual machine ip address is 10.11.32.60.
nano /etc/nginx/conf.d/librenms.conf
You create a new configuration file named librenms and edit the line server name. You update the ip address of your virtual machine in the server name line.
server {
 listen      80;
 server_name 10.11.32.60;
 root        /opt/librenms/html;
 index       index.php;
 charset utf-8;
 gzip on;
 gzip_types text/css application/javascript text/javascript application/x-javascript image/svg+xml text/plain text/xsd text/xsl text/xml image/x-icon;
 location / {
  try_files $uri $uri/ /index.php?$query_string;
 }
 location ~ [^/]\.php(/|$) {
  fastcgi_pass unix:/run/php-fpm-librenms.sock;
  fastcgi_split_path_info ^(.+\.php)(/.+)$;
  include fastcgi.conf;
 }
 location ~ /\.(?!well-known).* {
  deny all;
 }
}
Don't forget to save the changes with "Crtl + X", then select "Y".
Once you get new config file delete default webserver config file and restart webserver service and restart php.
rm /etc/nginx/sites-enabled/default
systemctl restart nginx
systemctl restart php7.4-fpm
Next you enable snmp for the LibreNMS server to be able to self-monitor.
Enable snmp
ln -s /opt/librenms/lnms /usr/bin/lnms
cp /opt/librenms/misc/lnms-completion.bash /etc/bash_completion.d/
cp /opt/librenms/snmpd.conf.example /etc/snmp/snmpd.conf
nano /etc/snmp/snmpd.conf
You replace the default string "RANDOMSTRINGGOESHERE" with "public". With this string you will easily monitor itself. If you use a different string, make a note to enter it when adding it to the list of devices to track.
curl -o /usr/bin/distro https://raw.githubusercontent.com/librenms/librenms-agent/master/snmp/distro
chmod +x /usr/bin/distro
systemctl enable snmpd
systemctl restart snmpd
Next comes the configuration of scheduling and logs, just copy and paste.
Configuration of Scheduling and Logs
cp /opt/librenms/librenms.nonroot.cron /etc/cron.d/librenms
cp /opt/librenms/misc/librenms.logrotate /etc/logrotate.d/librenms
So you have completed all the commands as instructed. Now head to the web installer and follow the on-screen instructions.
http://10.11.32.60/install
You just need to be patient for 5 minutes to complete it. You can now access the web interface of the LibreNMS network monitoring tool using the ip address of the virtual machine. Here you need to find your database password again, in this example I did not change the information as instructed. So the database password is "password".

Next you create an admin account for LibreNMS. You will use it during the operation of LibreNMS. There is an error and let's fix it together.

It's a database error and more specifically a time zone error.

And we will fix this error as instructed. You access the database created in the previous step with the password as "password". Next you run three commands as instructed to fix the error.

So the error has been fixed and you are prompted to add the devices to be monitored in the system.
The final step of this article is to add the devices to be monitored to the LibreNMS system.
Add the devices to be monitored
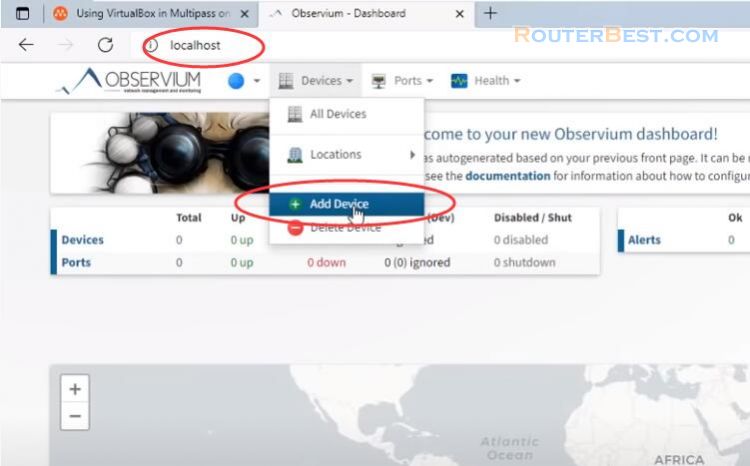
You only need to add devices by entering the ip addresses of the devices to be monitored. Go to "Devices" > "Add Device".
Since we have enabled SNMP for the LibreNMS server, you can add itself to the list of devices to be monitored. In this article, I show you how to install LibreNMS on a virtual machine, you can also install it on a real computer this way.
Facebook: https://www.facebook.com/routerbest
Twitter: https://twitter.com/routerbestcom
Tags: LibreNMS Virtualbox Ubuntu