This article explains How to configure WDS Bridging on the TP-LINK TL-WR741ND, TL-WR740N router. Its management IP is 192.168.1.1 or 192.168.0.1.
Step 1 : Log in TP-LINK TL-WR741ND wireless router
Open a web-browser (such as Microsoft Internet Explorer, Google Chrome, Mozilla Firefox or Apple Safari). Enter the ip address of TP-LINK TL-WR741ND wireless router: 192.168.1.1 or 192.168.0.1.
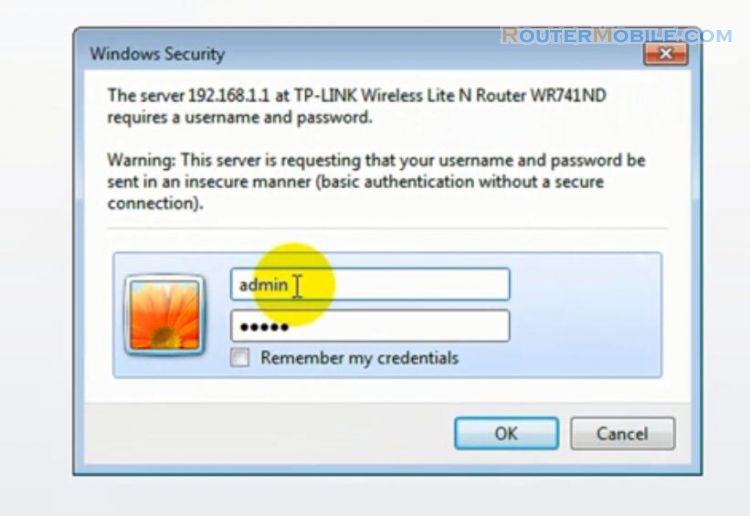
Username : admin
Password : admin
Step 2 : WDS Bridging Setting on TP-LINK TL-WR741ND, TL-WR740N router
Click : Wireless -> Wireless Setting -> Enable WDS Bridging

Then, click "Survey" button to choose an AP.

Note : The informations of APs which you could connect to are shown on this page. Use as follow :
First, find the line where the network you want to connect lay on.
Then, click the hyperlink "Connect" at the end of that line.
Now, the target network's SSID is filled in the correct place on the Wlan config page automatically.

Note : Click the Rrefresh button to update the AP list.
After choosing the AP, the SSID and BSSID will be filled.
Channel : 11
Key type : WPA-PSK/WPA2-PSK
Password : Enter the password of the AP you selected correctly.

Click the "Save" button to save your settings, then click "click here" to reboot your TP-Link Router.

Facebook: https://www.facebook.com/routerbest
Twitter: https://twitter.com/routerbestcom
Tags: 192.168.0.1 192.168.1.1 TL-WR741ND WDS Bridging TP-LINK