This article explains How to Login and Set up ASUS WL-550gE Wireless Router. http://192.168.1.1, username: admin, password: admin.
Connecting ADSL Modem and Wireless Router
Cable Connection

Status Indicators

PWR (Power)
Off No power
On System ready
Flashing-slow Firmware upgrade failed
Flashing-quick EZsetup processing
AIR (Wireless Network)
Off No power
On Wireless system ready
Flashing Transmitting or receiving data (wireless)
WAN (Wide Area Network)
Off No power or no physical connection
On Has physical connection to an Ethernet network
Flashing Transmitting or receiving data (through Ethernet cable)
LAN 1-4 (Local Area Network)
Off No power or no physical connection
On Has physical connection to an Ethernet network
Flashing Transmitting or receiving data (through Ethernet cable)
Wall Mount Option
Out of the box, the ASUS Wireless Router is designed to sit on a raised flat surface like a file cabinet or book shelf. The unit may also be converted for mounting to a wall or ceiling.

Follow these steps to mount the ASUS Wireless Router to a wall:
1. Look on the underside for the four mounting hooks.
2. Mark two upper holes in a flat surface using the provided hole template.
3. Tighten two screws until only 1/4'' is showing.
4. Latch the upper hooks of the ASUS Wireless Router onto the screws.
Note: Re-adjust the screws if you cannot latch the ASUS Wireless Router onto the screws or if it is too loose.
Vertical Standing Option
The ASUS Wireless Router can also stand on its side to save space. Two hinges can be opened on the right side to support vertical standing. Orientate the antenna so that it points upwards.

Configuring the Wireless Router
Note:
1) Before you start, we recommend using wired connection for initial configuration which avoids possible setup problem due to wireless uncertainty.
2) ASUS also provides an EZSetup button for fast wireless configuration. If you prefer EZSetup to arrange for your wireless network configuration, please refer to chapter 6 of WL550gE userʼ manual included in the support CD.
The ASUS Wireless Router can be configured to meet various usage scenarios. Some of the factory default settings may suit your usage; however, others may need changing. Prior to using the ASUS Wireless Router, you must check the basic settings to guarantee it will work in your environment. Configuring the ASUS Wireless Router is done through a web browser. You need a Notebook PC or desktop PC connected to the ASUS Wireless Router (either directly or through a hub) and running a web browser as a configuration terminal. The connection can be wired or wireless. For the wireless connection, you need an IEEE 802.11g/b compatible device, e.g. ASUS WLAN Card, installed in your Notebook PC. You should also disable WEP and set the SSID to “default” for your wireless LAN device. If you want to configure the ASUS Wireless Router or want to access the Internet through the ASUS Wireless Router, TCP/IP settings must be correct. Normally, the TCP/IP setting should be on the IP subnet of the ASUS Wireless Router.
Note: Before rebooting your computer, the ASUS Wireless Router should be switched ON and in ready state.
ASUS Wireless Router Wired Connection
One RJ-45 cable is supplied with the ASUS Wireless Router. Auto crossover function is designed into the ASUS Wireless Router so you can use either straight-through or crossover Ethernet cable. Plug one end of the cable into the WAN port on the rear of the ASUS Wireless Router and the other end into the Ethernet port of your ADSL or Cable modem.
Wireless-Connection
Note: If configuration is done via wired connection, ignore this.
Refer to your wireless adapter userʼs manual on associating with the ASUS Wireless Router. The default SSID of the ASUS Wireless Router is “default” (lower case), encryption is disabled and open system authentication is used.
Setting IP address for Wired or Wireless Connection
Get IP Automatically
The ASUS Wireless Router incorporates a DHCP server so the easiest method is to set your PC to get its IP address automatically and reboot your computer. So the correct IP address, gateway, DNS (Domain Name System Server) can be obtained from the ASUS Wireless Router.

Note: Before rebooting your PC, the ASUS Wireless Router should be switched ON and in ready state.
Setting IP Manually
If you want to set your IP address manually, the following default settings of the ASUS Wireless Router should be known:
• IP address 192.168.1.1
• Subnet Mask 255.255.255.0.
If you set your computerʼs IP manually, it needs to be on the same segment. For example:
• IP address 192.168.1.xxx (xxx can be any number between 2 and 254 that is not used by another device)
• Subnet Mask 255.255.255.0 (same as the ASUS Wireless Router)
• Gateway 192.168.1.1 (this is the ASUS Wireless Router)
• DNS 192.168.1.1 (ASUS Wireless Router IP address or your own).

Configuring the Wireless Router
Enter the following address in your web browser: http://192.168.1.1


Default User name: admin, Default Password: admin
After logging in, you will see the ASUS Wireless Router home page. The homepage displays quick links to configurate the main features of the router.

Quick Setup
To start quick setup, click Next to enter the Quick Setup page. Follow the instructions to setup the ASUS Wireless Router.

Select your time zone or the closest region. Click Next to continue.

ASUS wireless router WL550gE supports five types of ISP services— cable, ADSL (PPPoE, PPTP, static IP address), and Telstra BigPond. Since each service has its own protocols and standards, therefore, during the setup process, there are different identity settings demanded by WL-550gE. Select the correct connection type and click Next to continue.
Cable User
If you are receiving services from cable or other ISP assigning IP addresses automatically, please select Cable Modem or other connection that gets IP automatically. If you are using cable services, your ISP may have provided you with hostname, MAC address, and heartbeat server, if true, please fill these information into the boxes on the setting page; if not, click Next to skip this step.

PPPoE User
If you are PPPoE service user, please select the second line. You would be required to input the username and password provided by your ISP.

PPTP User
If you are using PPTP services, you would be asked to input the username, password, as well as the IP address provided by your ISP.

Static IP User
If you are using ADSL or other connection type that uses static IP addresses, please select the fourth line, then input the IP address, subnet mask, and default gateway provided by your ISP. You could choose to specify certain DNS servers, or select to get DNS automatically.

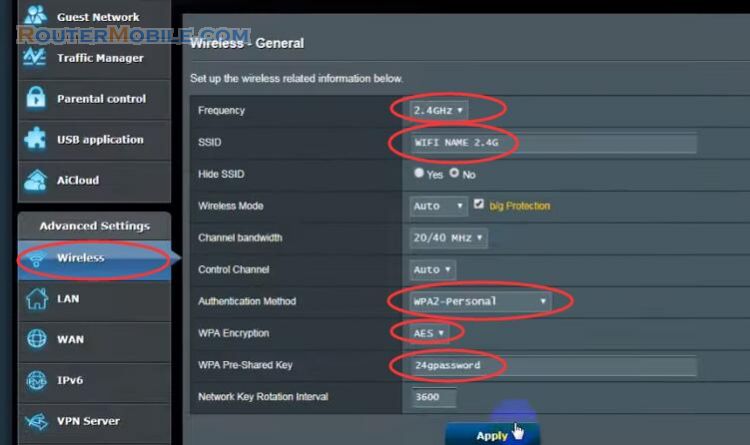
After setting the connection type, you are to set up your wireless interface. First, give an SSID (Service Set Identifier), which is a unique identifier attached to packets sent over WLANs. This identifier emulates a password when a wireless device attempts communication on the WLAN. Because an SSID distinguishes WLANs from each other, access points and wireless devices trying to connect to a WLAN must use the same SSID.
If you want to apply security solution to your wireless network, select a proper level (Middle or High) in the Security Level menu; then specify WEP Keys in the following boxes.
Medium : only users with the same WEP key are to connect to this access point and to transmit data using 64bits or 128bits WEP key encryption.
High: only users with the same WPA Pre-Shared Key (WPA-PSK) are to connect to this access point and to transmit data using TKIP encryption.

Note: The ASUS wireless router configuration page features a convenient approach to setup the WEP Keys: with only a few taps on your keyboard to define the Passphrase, the system will automatically generate four strings of WEP Keys. For ASUS wireless adaptor users, it is no longer necessary to input long and complicated WEP Keys when connecting the router with the wireless client; the Passphrase provides an easy way for setting up your wireless environment!
For example, if we input select WEP- 64bits encryption mode, input 11111 as Passphrase, then the following WEP Keys are generated as shown in the right picture. Record the Passphrase and the WEP keys on your notebook, then click Save.

Click Finish to continue. You are prompted to save the settings. Click Save&Restart to save the settings to the ASUS Wireless Router and enable the new settings.

Next we are to setup encrypted wireless connection for wireless router and wireless client. If you have installed ASUS wireless adaptor as well as the utility, click Start -> Programes -> ASUS Utility-> WLAN Card -> One Touch Wizard to open the connection setup utility on the client end.

Select Connect to an existing wireless LAN (Station) when the welcome window appears, then click Next.

ASUS ONE TOUCH WIZARD searches and displays all the available stations as shown in the picture. Select WL550gE and press Next to continue.

The setup wizard then asks for encryption setup. Set Key Length as 64 bits (10digits) as we have previously set on WL-550gE, then select Automatic Generation and input 11111 into the Passphrase box.

Note: The encryption mode on your client must be the same with that on your wireless router.
Wait for several seconds to get the client connected to the wireless router. Then a screen informing the result of the connection would appear. Press Next to continue.
Then you will see the IP configuration screen. Setup the client IP address according to your network condition. After the setup is completed, Click Finish.
For non-ASUS wireless adaptor users, you can set up the wireless connection between your computer and the wireless router with Windows Zero-Configure function. Right click the Network Neighbour on the desktop of your client and click Property, then in the Network Connection window, double-click Wireless Network Connection icon, a window with all available stations appears. Select WL550gE and click Connect.

The connection process would take about several seconds. Then a window prompts out asking you to input the network keys, input the 10-digit key you have previously recorded in your notebook, then click Connect to complete connection.

To adjust other settings, click on items on the menu to reveal a submenu and follow the instructions to setup the ASUS Wireless Router. Tips are given when you move your cursor over each item.
Facebook: https://www.facebook.com/routerbest
Twitter: https://twitter.com/routerbestcom
Tags: WL-550gE ASUS 192.168.1.1