This article explains How to Share Files over Internet step by step. How easy it is to share files through web browsers, because web browsers are available on any computer.
So is it difficult to share files like that? The answer is no, you read this article till the end to know how.
First you install IIS for your computer.
Install and Configure IIS
Search "run", or right click the icon of windows in the lower left corner and select "run". Then ,open "optionalfeatures".

When installing, don't forget to select WebDAV Publishing and Basic Authentication features.

Here I will guide you step by step from basic to advanced. Thereby you can freely choose how you build your own website. After the installation is done open IIS and configure it.

After installing IIS you will have a default website and we will use it to create a shared website. You select Default Website in the left menu and then enable the Directory Browser.


Next you enable WebDAV Authoring Rules.


After enable you create a new rule, here you choose All User. Under Permissions you choose Read, Source, Write. For basic needs, you just need to configure IIS like that.

Now you create a new folder in the root of the website and copy the data you want to share there. Go to "C:\inetpub\wwwroot". Here I will create a new folder and name it test.

Then I will copy some photos to share with everyone. Now let's try accessing it with a web browser to see if it works. Open a web browser and enter "http://localhost/test/". As you can see we have created a sharing site. We can view and download these files.

But as you can see it only works within your local network, so what do you need to do to access this shared site through the internet? We will deal with this in the next steps.
Set a static IP address
First of all you will set a static ip address for your computer. With port forwarding on the router will require your computer to have a static ip address.
Go to "Control Panel" > "Network and internet" > "Network Connections". Right click the Ethernet icon, select "Properties".

Select "TCP/IPv4" and click "Properties" button. In this example I assign my computer a static ip address of 10.11.32.99.

Depending on your local network ip address range, you assign the ip address accordingly. Next you will forward port 80 to the static ip address you just set up in the previous step.
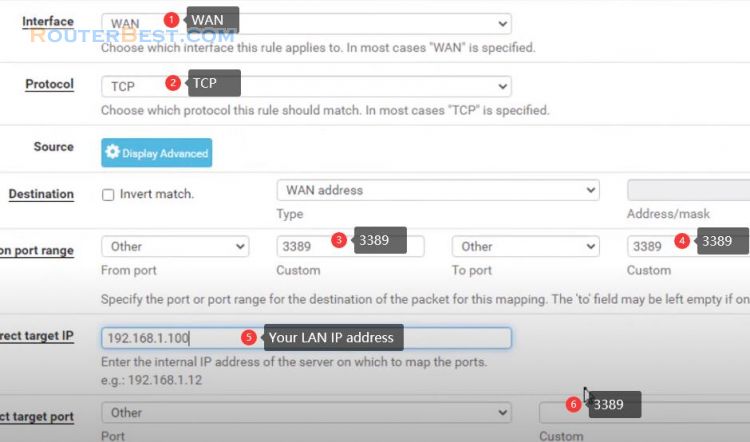
Port Forwarding
Open your router managment panel. Specifically I create a new port forwarding, name it http and will forward it to ip address 10.11.32.99.

For your router, the way to forward the port will be different, so you should refer to the manufacturer's homepage for how to do it.
After successful port forwarding, you can access your website from anywhere using your public ip address.
Dynamic DNS
However, usually we use dynamic public ip address so we need to fix it with Dynamic DNS service. With Dynamic DNS we both get a domain name and can update the public ip address dynamically.
Here I use Dynu, a free Dynamic DNS service. I already created a domain name routerbest.freeddns.org and I will assign it to my sharing site.

To update public ip address you need to install dynu client.

After installing the software and entering your account, your public ip address is updated and assigned to your domain name. This way your shared site has a domain name and you don't need to worry about public dynamic ip address anymore.
So we have finished the basic steps and have a complete sharing website. But if you want to set a password or encrypt the communication between the user and the website, then read this article till the end.
Set a Password
You create a new password for your Windows account if you don't have one yet. Here my Windows account is n1 and I will set password as 123. In fact I recommend setting a strong password.

Next you will enable Basic Authentication for your website.


From now on when accessing the website you will be asked to enter your username and password. So now only people with an account can access your website.
Even so, your website is not encrypted between the user and the web server. As such important today that will be at risk of being stolen. In the next section we will encrypt these communications.
HTTPS
First of all, you need to download the Win ACME tool. This tool will generate certificates to encrypt communications for IIS.

After downloading the compressed file of win acme, extract it and name the file so it's shorter and more user-friendly.
Before using windows acme, you need to create a self-signed certificate for your website.


After obtaining the self-signed certificate you assign it to your website. Don't forget to enter your domain name under Host name.

Since self-signed certificates are not as secure as let's encrypt, you need win acme. We try to access the website using https and fail. This error occurs because we have not forwarded port 443 on the router. So I create a new forwarding on the router and name it https. And I forward port 443 to ip address 10.11.32.99. This is the ip address of the computer where my website is located. Thus you can access your website using https.

Now we will encrypt the communication using win acme. Don't forget to run acme with admin rights.

With the first setup you create a new certificate, acme will automatically find your domain name on IIS to generate a certificate for it. During setup you will be asked to update your email address, you need to fill in the information to complete. Because the default certificate is only valid for 6 months, acme will automatically schedule it to renew the certificate.
You can check the task scheduler on your computer to know how to renew the certificate for your site.

Return to your sharing site, you will see a lock icon next to it and your site is secure.
If you use it often and don't want to use a web browser, you can use the software WebDAV client to access the shared file.
WebDAV Client
There are many software to choose from, but I recommend using WinSCP. An easy to use and free software. With WinSCP you enter your domain name, your account is accessible to your shared website.

In addition to downloading files, you can also upload files. But this way you can only upload small files. Thank you for reading.
Facebook: https://www.facebook.com/routerbest
Twitter: https://twitter.com/routerbestcom
Tags: WinSCP Win ACME Dynu Port Forward IIS